

 8667
8667
If Adobe Connect is not set up correctly or if a recent update has been made to the platform, you may experience issues during class. If you are using Adobe Connect for the first time, follow the instructions in the Getting Started article.
Teacher Missing/Dropped from Classroom
As Kolbe Academy is an online school, tech issues are bound to happen—even with teachers! If your class has not opened 5 minutes after the scheduled start time, or your teacher is dropped from a live classroom for more than 5 minutes, start a Live Chat with an agent on kolbe.org or email [email protected], and a Kolbe administrator will moderate the classroom while the teacher is gone.

Note: Occasionally a teacher may cancel a class due to illness or emergency. If this is the case (and no substitute teacher is scheduled to cover), the teacher will make a note in Schoology and will post a recording for you to watch later. Be sure to check the course’s Schoology page if your teacher has not shown up at the start of class before reaching out to tech support in case he/she cancelled class for the day.
Classroom Headset (Speaker) Check
Note: If your speakers are working, but your microphone isn’t, skip to microphone troubleshooting section.
When you first log in to a virtual classroom, the speaker icon should be green as a default, which indicate that your speakers are on. If the speaker icon is gray, it means that your speakers are turned off in the Adobe Connect classroom—click the icon to turn them on, which will change the icon to green.
![]()
If you still cannot hear anything in your headset, click the drop-down arrow next to the speaker icon and make sure that the correct headset is selected. If the proper headset is already selected, you can also click Adjust Volume.

Computer Volume Check
If your volume settings look correct in the Adobe Connect classroom, the next step is to check and make sure your computer’s volume settings are correct.
Note: This section is intended for Microsoft Windows. If you are a Mac user, the instructions are similar. You can find official Apple documentation on how to check your Mac’s volume settings by visiting this Apple support page.
Make sure your computer’s volume is at an acceptable level by clicking the speaker icon on your task bar (this is usually found to the bottom-right of your computer screen, unless you’ve altered the task bar’s position or settings). Next, Make sure your computer volume is not muted (if it is, there will be a slash through the speaker icon).

Finally, right click on the speaker icon and click Open Volume Mixer from the menu that appears.
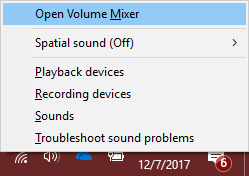
Locate the Adobe Connect application in the Volume Mixer. You may need to use the horizontal scrollbar at the bottom of the Mixer’s window to locate the application. Once you find it, make sure the volume levels are at an acceptable level.

If the above steps do not fix your issue, the next step is to ensure the application is up-to-date (see section further below).
Classroom Headset (Microphone) Check
If you find that your microphone is not working, first make sure your microphone icon is green. If it is gray, it means your microphone is not turned on in the Adobe Connect classroom.


Once you’ve checked that the microphone icon is green and not muted, make sure the correct microphone is selected by clicking the drop-down arrow next to the microphone icon. Hover over Select Microphone and make sure the correct microphone is selected from the list.

Use the "Test Microphone" option to help you run through options and volume checks.

This will open a window similar to what you see before logging into class that will allow you to test and adjust your speaker and microphone settings. Follow the instructions listed on each window.

If your microphone still isn’t working, completely log out of the Adobe Connect classroom then log back in and try again. If restarting the Adobe Connect classroom doesn’t resolve your issue, we highly suggest looking to see if your computer needs to be updated and restarted.
Checking your Connection
If you experience continuous lagging or glitches in the Adobe Connect classroom, please run the Adobe Connect Diagnostics Test:
https://kolbe.adobeconnect.com/common/help/en/support/meeting_test.htm (You should bookmark this link for future reference.)
If you receive all green checkmarks, please continue to the next section.
Updating the Application
Adobe Connect regularly releases updates to its application. Kolbe administration notifies students and parents in advance of these updates via Schoology posts. However, if the steps in the above sections have not resolved your headset and internet connection issues, you should verify that your Adobe Connect application up-to-date in case you missed an update from Kolbe.
To do this, click the “Help” button located at the top-right of the Adobe Connect classroom, then select Check for updates from the drop-down menu. This will tell you whether or not your application is up-to-date.

If there is an update, a window will appear that gives you the option to click Not Now or Update.
If there is no prompt, delete the application off of your computer and go here to download the newest version: https://helpx.adobe.com/adobe-connect/connect-downloads-updates.html.
Whether or not you had to update your application or add-in, completely restart your computer to see if your headset or connection issue is resolved. If the issue is still not resolved, the final option is to contact Adobe Connect support.
Update your Computer and Restart
There are generally operating system updates regularly by Windows or Mac. Before reaching out to tech support, check for updates and restart your computer. This often does the trick!
Contacting Adobe Connect Tech Support
If none of the above steps resolve your headset issue, it’s time to reach out to Adobe Connect’s support team. To do this, visit the following URL (it is recommended that you bookmark this URL in case you need to reach out to them multiple times throughout the school year):
https://helpx.adobe.com/adobe-connect/connect-support.html
Click the live chat button on the lower right side of the screen.

This will open a window that will allow you to chat with an Adobe Connect representative. Get your parent’s permission before contacting Adobe Connect.
Note: The Adobe representative may request remote access of your computer so they can best resolve your issues. If they do this, make sure your parent is present for this process.

